Nexus Model/Texture Converter
The Nexus Model/Texture Converter
Here's a quick guide to getting the converter working for you. Now I don't know everything about the converter (indeed, if you see something that I've missed or do differently, then please add your comments), but here are the steps that I follow to turn my models and textures into something the game understands.
- Step 1)
Rather obviously, start up the Nexus Modding tools and click on the 'Start Model/Texure Converter' button. Chances are, you'll be met by this warning...
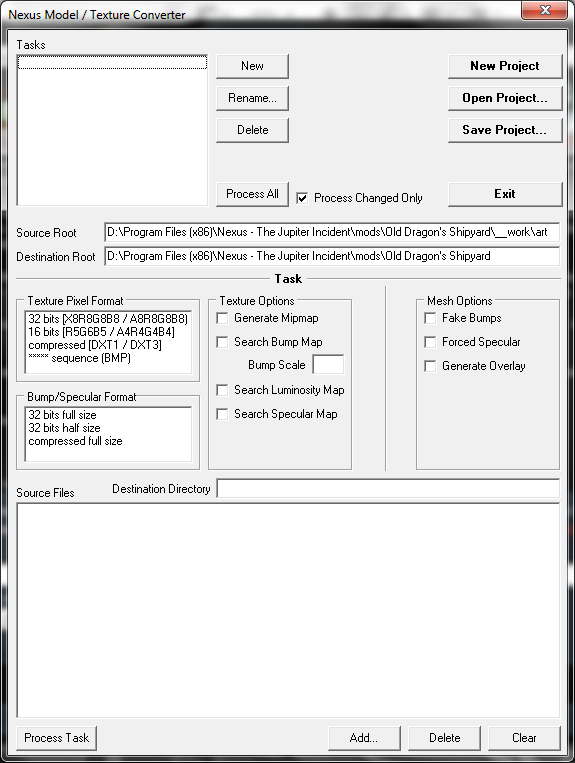
Don't worry, that's normal. Just click ok to procede. The next thing you'll see is the converter UI, so let's take a quick look...
Ok then, in the top right of the UI, we've got four buttons with bold writing on them... fairly self explanatory in themselves and for the most part, you won't need to do anything with them.
Just across from them, we've got a text box and another four buttons. Again these little 'task' commands are self explanatory, but you will need to use these later.
Below them, we have the source and destination roots. Or in laymens terms, where to find your models & textures along with where the results of your work will end up. Now when you first load up the converter, it will automatically fill these in using the details of the mod you've currently got selected in the ModTools (that first thing you clicked on).
Next up, are the 'Task' options; quite a lot in here so stay with me.
On the left we have the 'Texture Pixel Format' and the 'Bump/Specular Format'. As far as I know this changes the size and quality of your texture files, best have a play and see how it turns out to see what works best for you.
Moving into the middle, we find our texture options. Generate Mipmap - The mipmap demands more memory, but increases render speed. Enhances textures and effects I think. We also have three 'search' options here, if you've created one of those maps (__Bump, __Lum or __Spec) then you can have the converter search for them.
Then on the right, we have the 'Mesh' options. The only real one of these is 'Generate Overlay' , this is what gives the model it's ability to show damage as it takes punishment. The other two options are 'inopportune' according to the manual... make of that what you will.
Next down, we have the 'destination directory', this is where you tell the converter exactly where to place the converted files... and below that you've got the 'source' version i.e. where the files for formatting are.
And below that we have four more buttons, one to tell the converter to get on with it and three more on the right to add or remove which files you want to convert.
So with all that rambling done, let's convert something!
- Step 2)
Ok then, in the top left of the UI, click on the 'new' button. This will open a new dialog box for you to name the task your working on, it's up to you what you choose to call it. Do so now please....
- Step 3)
Set any options you wish to...
- Step 4)
In the 'Destination directory' , write the remaining pathway to where you wish the file to go. What I mean by this is, in the Destination root (the one I told you to leave alone) we have half of the directions of where we want our converted files to go (i.e. into the mod we're working on), now we have to write the rest.
If you're unsure, then type this into the 'Destination directory' ...
/Meshes/New
This will create a new folder in your mods 'Meshes' folder; at least that way, your new files will be easier to find.
- Step 5)
Click on the 'Add' button in the bottem right of the UI. This will open up a new window in which you can 'browse' to the folder where your model/texture file is. Select the file (or files if required, you can add multiple files in one go) and click on 'open'.
Hopefully, you should now be seeing a short filepath like this...
However, if you end up with a longer filepath like this...
Then you'll need to clear the 'Source Root' field, otherwise you'll be asking the game to navigate to your mod and then look for the drive that the game has been installed into... not gonna happen. I suspect this can happen if the source files are located outside of your mods folder.
As I'm sure you can tell, the 'delete' button will remove the high-lighted entry while the 'clear' button will remove the lot.
By now you should have a converter that looks a little like this...
Although you can't tell fron the pic, the first entry in the 'Source files' box is for the model, while the second is for the texture. If you've created some of the additional maps (Bump, Luminosity or Specular), you don't actually add them (you can't), as long as you've ticked the relevant boxes then the converter will add them automatically.
- Step 6)
And finally, click on the process button in the bottom left to convert your files. Job done.
Note:
If you just want to do a 'quick' conversion to see how things are looking with your model, then you can open the viewer tool and click on your .LWO/.LWS files directly. The viewer will search for any related texture files and convert them. The object that gets created will appear in the 'temp' folder in the main directory.
Hope that helps anyone who's having problems getting this to work.
Regards,
The Old Dragon.


