Nexus:TJI Mission Making
WARNING: While this is in place, the tutorial is not complete!
Mission Creation Tutorial
Here, in this tutorial, is where we’ll learn how to place objects within a mission area and then give them instructions on what to do and how to behave. Now before I begin, I’d just like to offer thanks once again to Jusas for writing the original tutorial (Missionmaking(for dummies)) which I’m once more using as a foundation (as with the Nexus:TJI Creating Solar systems tutorial). We won’t go too deep into the Nexus depths or I’ll never finish this tutorial, simply because there’s way too much (and I sure as heck don’t understand half of it!). But by the time you finish this section, you will have a playable mission and know enough to go paddling in the great Nexus ocean. Now, just like the previous tutorial, we can’t just open the editor and make missions. It doesn’t work that way, we’ve got a few things that we’re going to have to prepare first…
Before we can do anything, we have to decide what’s going to happen, what it is we’re going to create… a plan. It’s all fine and well saying “let’s write a mod”, but about what? We have to figure all this out before we can write it. So, as this is my tutorial, I’ve decided that the scenario is going to be…
As part of its patrol, a small human fleet is to investigate an asteroid field. After all, there’s no telling what could be hiding within from long range sensors – a look see is required. Our ships will ‘jump in’ and proceed to the field, where upon they will discover some Gorg ships that shouldn’t be there. As per convention, we have to warn them and give them a chance to withdraw. After that, we get to kick ass. We’ll also have two objectives to achieve as well. The first, is our primary objective and it is to eliminate any hostile presence. The second will, strangely enough, be a secondary objective to ensure the survival of our main ship.
Ok, we now have a simple plan of action, so let’s get to work…
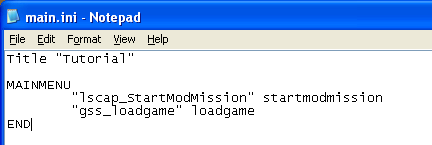
Right then, navigate to the universe folder you created so long ago and create a new text document. Then rename it to main.ini, whenever we change a file type (and we’ll be doing it quite often!), our pc will complain that the file might not work, etc. Don’t worry, it will, so just say yes…
Then open our new file and type in the following…
Save and close, that’s it for this file. What we’ve done here is make an entry in the menu for our new mod, enabling us to load it into the editor. There are other lines you could enter, but they’re not required by us for this mod. Next up, I’d like you to go to the ‘mod_missions’ folder and create a new text file, naming it ‘My_First.mission’. Now this file is where most of the magic will take place and we’re going to tackle it in two stages, so… stage one.
First, make your way to the solar system file you created earlier. Open it up and locate a “NAVPOINT” entry (if you added more than one, then choose any. It’s completely up to you.)
Select and copy the text in the quotation marks, then close.
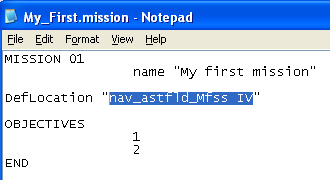
Second, go back to the mod_mission folder and open the .mission file and type the following…
And paste your navpoint name into the highlighted section, save it and close.
Remember I told you that the nav‐marker was probably the most important thing you could add to a solar system towards the end of Nexus:TJI Creating Solar systems tutorial? Well this is the reason why. Without a ‘nav’ location, the game won’t know what scenery to load and therefore, won’t load our mission. Oh, and while I’m thinking about it. The very first line is important because not only will it be used to denote the missions place in a campaign (should you chose to go down that road) but also, another file that we’ll play with later requires it so that it can associate the missions objective with the mission script.
Run the mod_tools.exe from the Nexus\mod_tools folder once again, select our ‘Tutorial’ from the drop down menu and click on the Mission Editor. From the menu that appears, we should now be able to select ‘My First Mission’ by either double‐clicking or high‐lighting it, then clicking on the edit mission at the bottom of the screen. Do so, and we’ll enter our mission area. Just like the Solar System editor, this is a “wysiwyg” editor. So everything is graphical at this point. When we start up this beastie, three windows will open, the big window in the middle is where we’ll do all our placing and manipulating. A second window (the Nexus Console) will open up behind this main window, you can ignore this window for now as it’s mainly used for debugging purposes (just don’t try and close it). Finally, the third, smaller window will open up to the left. This is our command pane.
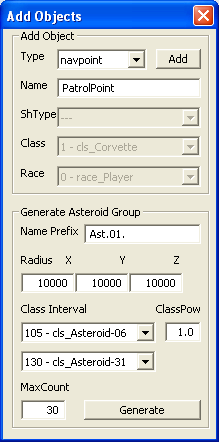
We’re not going to go overboard here, all we’re going to add is a nav‐point, an asteroid field and two small fleets. So, the nav‐point first…
1) Click the Add Objects button in the command pane. This will open the following window.


