Nexus:TJI Mission Making
Mission Creation Tutorial
Here, in this tutorial, is where we’ll learn how to place objects within a mission area and then give them instructions on what to do and how to behave. Now before I begin, I’d just like to offer thanks once again to Jusas for writing the original tutorial (Missionmaking(for dummies)) which I’m once more using as a foundation (as with the Nexus:TJI Creating Solar systems tutorial). We won’t go too deep into the Nexus depths or I’ll never finish this tutorial, simply because there’s way too much (and I sure as heck don’t understand half of it!). But by the time you finish this section, you will have a playable mission and know enough to go paddling in the great Nexus ocean. Now, just like the previous tutorial, we can’t just open the editor and make missions. It doesn’t work that way, we’ve got a few things that we’re going to have to prepare first…
Before we can do anything, we have to decide what’s going to happen, what it is we’re going to create… a plan. It’s all fine and well saying “let’s write a mod”, but about what? We have to figure all this out before we can write it. So, as this is my tutorial, I’ve decided that the scenario is going to be…
As part of its patrol, a small human fleet is to investigate an asteroid field. After all, there’s no telling what could be hiding within from long range sensors – a look see is required. Our ships will ‘jump in’ and proceed to the field, where upon they will discover some Gorg ships that shouldn’t be there. As per convention, we have to warn them and give them a chance to withdraw. After that, we get to kick ass. We’ll also have two objectives to achieve as well. The first, is our primary objective and it is to eliminate any hostile presence. The second will, strangely enough, be a secondary objective to ensure the survival of our main ship.
Ok, we now have a simple plan of action, so let’s get to work…
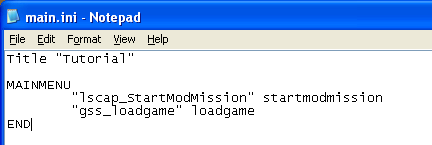
Right then, navigate to the universe folder you created so long ago and create a new text document. Then rename it to main.ini, whenever we change a file type (and we’ll be doing it quite often!), our pc will complain that the file might not work, etc. Don’t worry, it will, so just say yes…
Then open our new file and type in the following…
Save and close, that’s it for this file. What we’ve done here is make an entry in the menu for our new mod, enabling us to load it into the editor. There are other lines you could enter, but they’re not required by us for this mod. Next up, I’d like you to go to the ‘mod_missions’ folder and create a new text file, naming it ‘My_First.mission’. Now this file is where most of the magic will take place and we’re going to tackle it in two stages, so… stage one.
First, make your way to the solar system file you created earlier. Open it up and locate a “NAVPOINT” entry (if you added more than one, then choose any. It’s completely up to you.)
Select and copy the text in the quotation marks, then close.
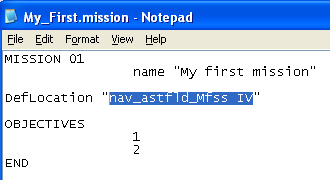
Second, go back to the mod_mission folder and open the .mission file and type the following…
And paste your navpoint name into the highlighted section, save it and close.
Remember I told you that the nav‐marker was probably the most important thing you could add to a solar system towards the end of Nexus:TJI Creating Solar systems tutorial? Well this is the reason why. Without a ‘nav’ location, the game won’t know what scenery to load and therefore, won’t load our mission. Oh, and while I’m thinking about it. The very first line is important because not only will it be used to denote the missions place in a campaign (should you chose to go down that road) but also, another file that we’ll play with later requires it so that it can associate the missions objective with the mission script.
Run the mod_tools.exe from the Nexus\mod_tools folder once again, select our ‘Tutorial’ from the drop down menu and click on the Mission Editor. From the menu that appears, we should now be able to select ‘My First Mission’ by either double‐clicking or high‐lighting it, then clicking on the edit mission at the bottom of the screen. Do so, and we’ll enter our mission area. Just like the Solar System editor, this is a “wysiwyg” editor. So everything is graphical at this point. When we start up this beastie, three windows will open, the big window in the middle is where we’ll do all our placing and manipulating. A second window (the Nexus Console) will open up behind this main window, you can ignore this window for now as it’s mainly used for debugging purposes (just don’t try and close it). Finally, the third, smaller window will open up to the left. This is our command pane.
We’re not going to go overboard here, all we’re going to add is a nav‐point, an asteroid field and two small fleets. So, the nav‐point first…
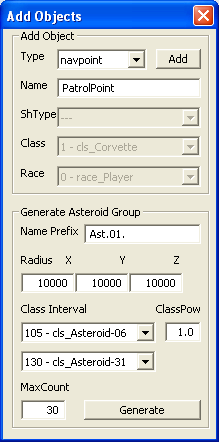
1) Click the Add Objects button in the command pane. This will open the following window.
2) In the drop down Type field, select ‘navpoint’, and rename it to PatrolPoint (Just a quick point, you can’t enter a ‘space’ in this field).
3) Click Add, and our navpoint will now magically appear in the centre of the scene (quick point - upon creation, objects are placed at the centre of scene!) and be high‐lighted. All that marks a navpoint in the editor is a small white arrow when it’s selected or the four corner squares when the cursor hangs over it. Like this…
So don’t be alarmed if it suddenly disappears, it’s still there. Believe it or not, that’s as good a place as any for it, so we’ll leave that alone and move onto the asteroid field. Once again, click on the Add Objects button to bring up the secondary window. Only this time, we’re more interested in the bottom half.
Name prefix ‐ As asteroid fields are scenery and very rarely will we do anything but hide amongst them, there’s no reason to assign our own name. Best to let the editor handle it.
Radius – Now this is what we want to adjust, we can make any size field we want, just bear in mind that it will always have ‘spherical’ nature to it (we can stretch it as much as we want, but we can’t make weird shapes out of a single field) and the unit measurements are in metres. But for our purposes, we just want a small field, so set all three values to 5000.
Class Interval – There are actually thirty‐five different asteroids we can choose from, with these two fields, we can specify just how many of them we want to use but I normally find the default values to be ok (and I’ve no idea what the ClassPow is).
MaxCount – Self explanatory here, how many ‘roids do you want? Just remember, the more you have, the harder your pc has to work! As I said earlier, we only want a small field, so set this value to 100. And click on Generate. Just like the navpoint, this field is just fine where it is.
Just like using the other editor, I’d recommend saving at regular intervals.
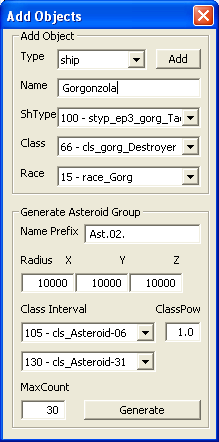
Next up, we’ll add two Gorg destroyers. As I don’t particularly like cheese, we’re gonna call them ‘Gorgonzola’ and ‘Edam’. So by now you should have already brought up the secondary window. In the Type window, make sure that ship is selected. Then, in ShType, scroll down till you find number 100. As you just saw, once you selected it, the Class and Race fields sorted themselves out… nice, huh? Now all you have to do is fill in the Name field and press Add and it’s in our scene.
Ok, open it up once more and you’ll notice that it’s still filled in apart from the name, kinda makes life easier when you’re bringing in multiple ships of the same type. So change the name (‘Edam’) and add the second ship.
So now that you know how, I want you to add three more ships – a human cruiser (ShType 135) named ‘Defiance’, along with two destroyers (ShType 133) named ‘Striker’ and ‘Lightning’. Now that you’ve added them, it’s time to learn about positioning (after all, we can’t leave them on top of each other!).
First, let’s get the two Gorgs sorted out. Select one by simply clicking on it (or on its name in the upper panel of the Control pane). Also, if you double click on either of these, then you’ll zoom in for a close up of the object. Next, hold down SHIFT and then move your mouse around… and off she goes! With SHIFT pressed we gain access to the abilities of two dimensional movement, so we can now go up, down, left and right to our hearts content. But space is three‐dimensional I hear you cry! (Well, maybe not you guys, but there are enough voices in my head to make up for you), well, in order to gain access to this third plane of movement, we press SHIFT + LMB then move the mouse back and fore. So move those two ships to a starting position of your choice (but not too far away, keep them within two thousand meters of our navpoint!).
Next up select all three player ships (CTRL + LMB and don’t worry if they’re still on top of each other, we’ll sort that in a moment) and move them about 15k from the navpoint (Hint: If you want to know how far apart two objects are, then select one and move the cursor over the second. In the command panes lower window there’s a line that tells you). With that done, zoom in on the cruiser (remember, double click on it or find it in the list), then rotate the camera to look at the Gorg ships.
Using the CTRL + LMB combo, select the cruiser, then the two destroyers (in this order, it’s important for the next bit!). Next, by pressing and holding R then moving the mouse around, you can rotate the ships as much as you want. What I’d like you to do now, is point our ships towards the navpoint. After all, that’s where we’re heading. The final thing we’re going to do with these ships, is use a nifty little feature of the editor that’ll put our ships in formation. In the previous paragraph, I said to select the cruiser first, this is because the command we’re about to use makes the first ship we select the formation leader. So without further ado (and with the three human ships selected) press CTRL + F.
The final thing we have to do now is orientate the two Gorg ships to face our formation. With that done, save the mission (CRTL + S) and exit (CTRL + Q). That’s the last we’ll see of the mission editor now (well, for this mission at least) as everything else that’s left will be done with our text editor.
Make your way back to our mod_missions folder and open the .mission file there, then we’ll get ‘stage 2’ underway. Just like the solar system editor, the mission editor has filled in an awful lot of ‘positional’ and ‘type’ data for us, saving us from a hell of a lot of repetitive typing. Also, before we do delve into this, I’d just like to make you aware of one of my habits that you may wish to take up – but it isn’t required by the game in any way.
Throughout the .mission text, you’ll see the following symbol ‘//’. For those who’ve scripted before or know a little about the C++ language (on which this is loosely based, I believe), you’ll know what it means. But for those that don’t, this is known as “commenting out” and basically means we’re adding a comment for the human reader to understand and anything behind those to slashes will be ignored by the pc. So I use this feature to write lots of notes about what I’m scripting so when it goes wrong (and it invariably does. :( ) then I can find the relative section without too much brainache.
And save your files often, I cannot stress this enough! (Although you will be after watching a few hours’ worth of work disappear at the press of the wrong key!) So now that you’ve opened the .mission file (and found an ENTITIES section has been added), I’d like you to make a few little amendments to the bit you typed before. So, aside from the Deflocation line, you should now have…
Now everything else that we type into this file will go between the two words ’RULES’ and ‘END’ and the reason that my demo section is in bold is to make it stand out more for your benefit, not for any technical reason. So let’s create our first section…
This is always the ‘SceneInit’ rule and as its name suggest, this is where we set most of the names and variables for the mission. From here we’ll also be calling the mission machines (remember Arparso’s tutorial on machines, states,etc?) that the game will require. So let’s fill in what we can of it (because we’ll probably becoming back to it time and again to add little bits as we go along) and I’ll explain the different bits along the way. Time to start typing...
Ok, so we’ve now inserted our first actual, complete rule into the script. In order for us to issue commands, set conditions or do anything really, all the objects that we plan on doing things with need to be given names… or ‘variables’ to be technical. Without these, the game is effectively shouting at everything and nothing is paying the slightest bit of attention, therefore nothing appears to happen when we run our mission (much, much later). You may also notice that I put a space in “Patrol Point”? For some reason, we can’t put it in with the Mission Editor, but we can put spaces in at this point with no problems whatsoever (just don’t forget to adjust the name in the Entities section too or the game will get confused). And a final point before I move on to the next few lines of script, the reason I’ve put comments on the END lines is because you can get a strings of mutiple 'END’s in a row. As I’m sure you can imagine, this could get awfully confusing! So this is just a measure to help keep things clear.
In this next section we’ll add some rules to hide our ships, set our objectives up and make sure the Gorgs are hostile. So add these lines to the SceneInit…
You can more or less tell what’s going on the comments that I now add by habit, ok so I end up typing more than is strictly necessary but overall, it’s easier to figure out what’s going on at a glance.
By using the SelectShips and then the ExecList commands, we can issue orders to a number of objects as opposed to doing them all individually (Oh, you notice I use the phrase ‘S.this’ with the Disappear command? You’ll see it time and again as it generally refers to ‘the currently selected object’).
Now the SetRelation command only works one way, hence the reason we have two lines that start with the same command. The bit that determines how the two races treat each other is the number at the end. Although there are several values that can go in here, all we’re interested in at this early stage is 1=friendly and 2=enemy.
And finally, the third thing we did is actually split into two sections. The first section determines whether the objective is a primary or secondary objective. The first number in the command is the objective identification number while the second determines its importance (1=primary, 0=secondary. Basically, it’s an on/off switch). The second section decides at what state the objective is at. We can have either COMPLETED, UNCOMPLETED, HIDDEN or FAILED as our status.
Next…
There is a selection of music we can choose from depending on our scenario/mood, just have a look in the music folder for what’s available (You can also add your own music files too, but that’s a bit too advanced for now).
The graphical user interface (or GUI), that nice little bit that enables to us to play the game has a few settings available too. In the command we’ve just issued, we set the GUI to 0, which removes it entirely. In a little while, we’ll return it by resetting the value back to 3.We’ve also put our camera somewhere in front of the cruiser and looking at it with the command CamLocate. The first half of the command decides roughly where the camera will be and by using the second half, we choose just where to point it.
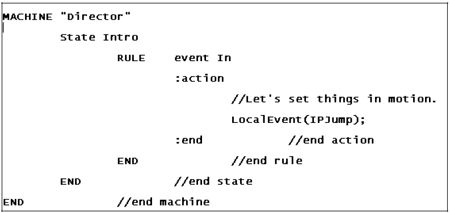
We’re almost done with this section now, just a couple of things left. We’re going to put the title up with a slight (one second) delay, just to allow the mission to load in and start up before it shows. The final bit we should always find at the end of the SceneInit is the commands to call the machines that we’ll be needing. As you can see, the first half calls the actual machine while the second half selects what state we should be in. So let’s take a look at our first machine…
Ok, so now we get a peek at what one of these beasties looks like. If you wanted to, you could start your lines tight against the margin or build them across the page as in my example. The reason I‘ve done it this way is because (at least for me) it actually makes it easier to read and spot mistakes (it’s all too easy to lose track of which ‘END’ you’re on). Also while we’re here, there are some fixed rule names that we can use in our scripts and for the most part, I’ll direct you to the modding manual (our most holy bible!) for these. But there’s one that I want to make you aware of, and that’s the RULE in my example. I didn’t choose the name ‘In’ at random, the first rule of any state should be named this (even if the rule remains empty!) because as its name implies, this will be the first rule that is to be read. There is also a rule named ‘Out’ which, as you’d expect, is the last rule in the state to be read before exiting said state (just for the perfectionists amongst you out there).
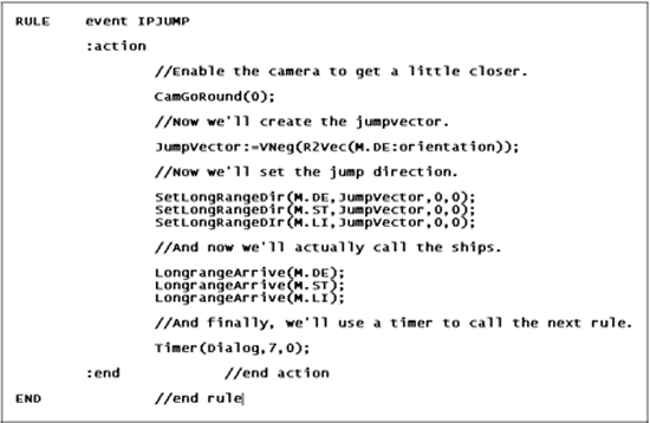
Our rule ‘In’ only contains one command, a simple summons for the next rule to be executed. So let’s slot it in just before the ‘end state’ END…
Ok, so what have we done here? Well, you’ve got my really short explanations within the script, so you could skip on down to the next section if you really wanted to. But for those polite folks determined to stick with me no matter how much I ramble, I’ll endeavor to give a few more details.
First of all, we told the camera not to avoid anything (CamGoRound()), meaning it’ll plow straight through everything in its path so you could end up inside an object if you’re not carefull with this command. Then we went on to the first and second required parts of getting ships to make a dramatic entrance. Now I’ll be totally honest, I don’t know what a Vneg is, much less an R2Vec. So I’ll have to assume that the JumpVector line used in conjunction with the SetLongRangeDir lines is us basically saying to the pc “take a look at this ship (in this case, the Defiance), ‘cause that’s the direction we want to be travelling in”. I might be right, I might be wrong, but it’s a good enough delusion for me. So let’s move onto the third required segment, actually calling the things.
Hmm… that kind of sums it up really. Damn.
Ok, the final command we’ve issued is for the next event, as you’ve probably figured out already, but we’re calling it with a Timer, not a LocalEvent command. The reason here being that we can’t have our captain giving orders before he’s actually arrived on the scene, now can we?
So let’s get that rule in place…
By now, you should have an idea on how things work, so let’s take a look at the two new commands…
In order for us to use a navpoint, we have to make it visible. As it is, the MakeFullyKnown command will show the designated object to everything. If we wanted to, by adding a race to the command, we could make it visible only to them.
A ‘Delayed’ Dialog. Well, the delay part is self explanatory – it’s there to stop something from happening straight away and measures the interval in seconds. The only thing to remember here, is to add the variable section onto the end (Nexus gets quite upset if you don’t!). Which leaves the Dialog section. The bit between the brackets is broken down into three sections –
The first is the name of the actual dialog file that is to be played (we’ll go more into this later),
The second part is where you wish this dialog to come from. We could put in the Defiance’s variable in this example, but it isn’t particularly important (considering what we’re going to do at the end of this file) so I’ve put in a value of ‘0’ for this field (again, I’ll explain more at a better moment).
Which leaves the final part – its priority rating, you can decide if one bit of dialog is more important than another one if you choose to, but I tend to leave this alone personally.
In the next rule that we’ve called (CameraRotate), we’ll get our camera to circle our little fleet and then reset it to avoid everything. We’ll also return the GUI so we can play the mission and the final thing we’ll cover is how to change states.
So the first thing to explore here is the CamOrient(); command. As per normal, it just does what it says on the can – we’re going to change the camera’s orientation, which requires five bits of information.
- 1) We need an object with which to position the camera, so we put in an objects variable (in this case, our cruiser – the Defiance).
- 2) Our heading in degrees. This is one of two ways, I’m not quite sure which. Either consider the Defiance’s prow as 0 degrees or the closest side of the object to you as 0 degrees and work out just where you want the camera.
- 3) The pitch (again, in degrees). In case you want to go above or below the object as well.
- 4) The distance in meters from the target we want the camera to end up.
- 5) The time in seconds. How long we want the camera to take when travelling from the start position to the end position.
Well, you already know about the CamGoRound and GuiSelect commands, so we’ll leave them alone.
Which leaves our method of calling another machine state. Just like the LocalEvent command, we simply name the state that we want to enter. But unlike the LocalEvent, we also have a variable section to fill in. In our example here, we’ve left it as a simple ‘0’, but later on we’ll do one with a variable entry. You’ll also notice that as we’ve reached the end of a state, there’s an extra END involved.
Right, on with the next state then…
Before we go into this little block, I’d just like to introduce you to another little habit that I’ve picked up along the way. Whenever I start a new script block (doesn’t matter if it’s MACHINE, STATE or RULE) I always write all the ‘ins’ (you know, the rule, the :action, etc) and all the ‘outs’ (all those ‘END’s) first. I just find that it helps me avoid forgetting the odd little bits (Hmmm, that’ll be the old age and Alzheimer’s kicking in, eh Old Dragon!) here and there.
But back to the new state!
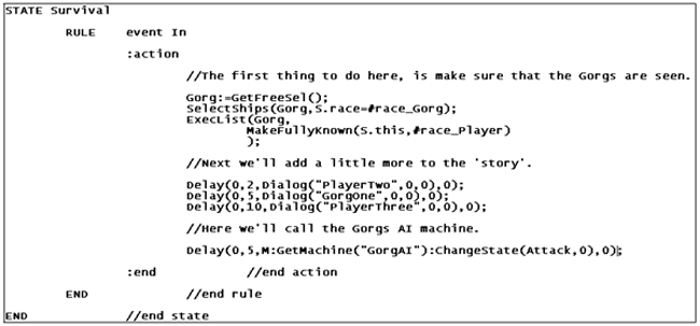
Ok, the first thing we did here was to select both the gorg ships and make sure that they’re visible to the player (chances are that they already are as we’re about 15k apart, but we’ll just be sure). If you think back a little, we’ve already talked about most of the first block, the only differences here being that we’ve added a ‘race’ variable to the MakeFullyKnown command, and that we’ve put a new command at the start. The GetFreeSel(); command is a means of allowing us to create a list with a name of our choosing (as opposed to simply using numbers, which in a complex mission, could see us ending up forgetting what list they actually refer to. Not good). Also, now that we have a named list, we don’t need to go through the selectships routine again to select the gorgs. We can skip straight to the ExecList bit! See, the devs do care about our finger tips. Though I wouldn’t rely on the list being transferred from machine to machine, best to make a new copy if you wish to do that.
Oh look, some delayed dialog, we’ve already been through that so I’d just like to say… if you can, try to figure out the correct ‘delay’ time for each bit of dialog. It’s not vital to the dialog itself (we could change the delays to 2,3 and 4 seconds respectively and they would still come out in the correct order, one after the other), it’s just that if you’re scripting something else to happen alongside this, the dialog makes for a good ‘time’ benchmark.
The final thing that we did in this rule was to call the machine that will control the enemy ships. We could have put this in the SceneInit section, but that would require us to play about with timing issues and also have a TICK rule running before we really need it to. This way, things are a little neater.
Next rule…
And welcome to our very first ‘TICK’ rule. The idea behind these rules is to continually check a certain set of conditions or run some commands at selected intervals (in this case, every five seconds). You see the line at the bottom that says ‘TICK 5’? This is where we set the checking interval. Without this present, the rule will not run, so it is very important.
However, you only need to put this line in once per state as all the TICK rules within that state will obey it. So let’s take a look at the commands within the rule shall we?
With the first command line, we’re getting the game to check that the cruiser is still alive. Should it not be, then we’ll change to one of two possible endings all thanks to the variable we’ve set.
In the second line, we’re doing exactly the same thing but with the gorg ships. Should this condition become true (i.e. there are no gorg left), then we get taken to the second ending we’re going script.
Wow, that’s the end of that state, thought I’d have to add more to it. Guess I’d forgotten how simple things can be sometimes…
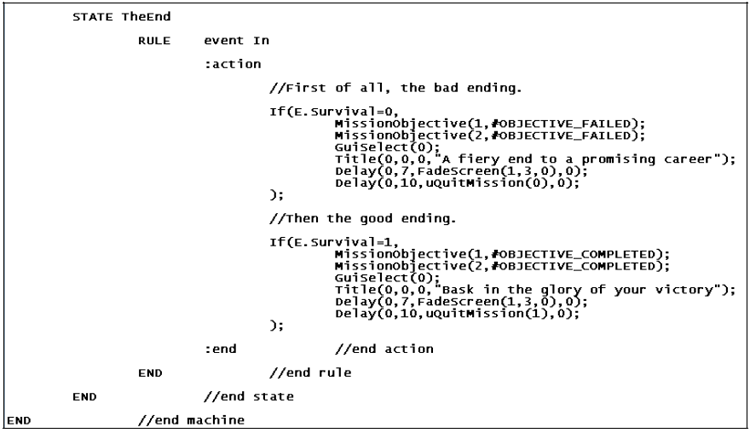
Now for the final state in this machine.
And there we have it in its entirety. As you can see, it’s made up of two ‘If’ statements ‐ the first to handle failures and the second for success. It’s mainly self explanatory and we’ve actually addressed most of these commands before so there’s not much more for me to add really.
As much as I’d like to say “there you are, now go and play your new mission…”, I’m afraid it’ll crash at the moment due to a command we put in the Survival machine – the one where we call another machine. So let’s rectify that by making a new machine that’ll handle the gorgs engagement rules.
Add the following lines to the .mission file.
Another short and sweet machine. Just to be safe, we’ve repeated the Gorg list because sometimes the game forgets these things from machine to machine. In laymans terms, what we’ve done here is write a really basic and dumb AI script which will make the gorgs chase our cruiser around. And just to give them a little bit of bite too, we’ve overpowered their weapons so they’ll be firing at anything that moves.
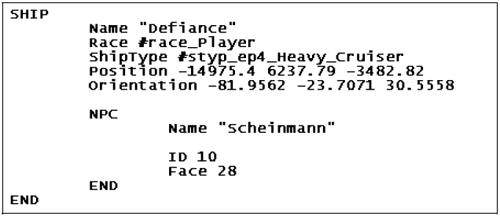
Ok, we’re almost done with this file. Just two more little bits to add now, we’re going to add characters to two of the ships. So scroll down through the ENTITIES section until you find the Defiance’s entry and amend it to read…
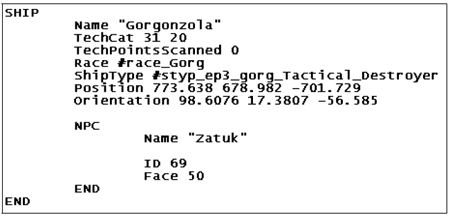
And the Gorgonzola’s to read…
And hey presto, you’ve just written your first mission script, HOORAH!!! (Feel free to run round wherever you are for a victory lap ☺ ). But before you get too carried away in your celebrations, we’ve still got two more short files to write before this mod is complete.
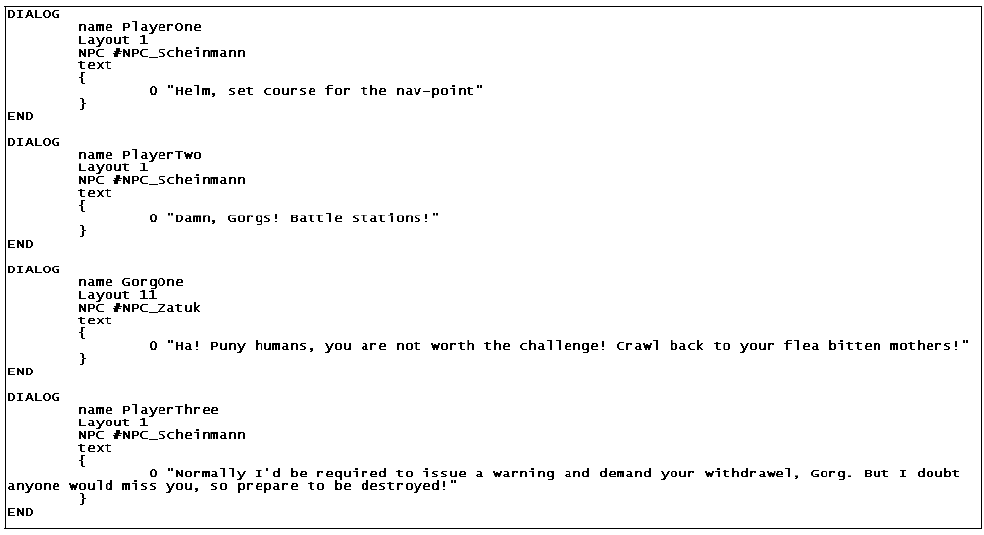
So now you’ve got to navigate your way to the Universe/texts/dialogs folder and create a new file called ‘My_First.ini’. Now this file is where we’re going to write all the text that is going to appear on the screen and make up our little ‘plot’. So open My_First.ini and add these lines…
As you can see, we’ve got four separate blocks of code here, the layouts always the same so let’s take a look at the first one…
DIALOG This informs our pc to start taking note.
Name What we’ve decided to call our file, can be anything really. Just remember that it’s your fingertips you’re wearing out with long file names!
Layout This denotes where on the screen our dialog box will appear. You can find more precise information about it somewhere in the manual.
NPC Well… who’s doing the talking, obviously.
Text Just warns the pc that the actual text’s coming up. As far as I can tell, the 0 is pretty important as it tells the game we’re speaking English.
END Tells the pc to go back to sleep.
There are a couple of other little bits we could throw in here, but they’re not really required for this mod. Ok, one down… one to go. Now make your way to the universe/texts/texts folder and create another file called ‘My_First.ini’. Don’t worry, the pc won’t get confused (we might, but it won’t), it knows the score here.
Open it up and type the following…
This is where we store the text that’ll appear when you open up the objectives window during the mission. Without this, all it shows is the ‘objective_1_1’ bit.
Closing Words
And that would be about it folks, you’ve now written everything you need to have a playable mod! It might not be the best thing since sliced bread, but it’s yours and it works (fingers crossed ☺). Hopefully, from here, you’ll start experimenting with the various editors and creating your own mods , I’d recommend reading other mod scripts and the manual for further reference and there are several forums that you can visit too should you run into problems (and you will).
Appendix – Mission Editor commands
Double‐click on an object Will zoom you in for a close up, moving the mouse around now will cause you to rotate around the object. A single click on another object now will turn the camera to show both objects in the view screen.
CTRL + F Will place all the selected objects into formation with the first object selected as the formation leader.
R Pressing and holding ‘R’ with an object (or objects) will cause that object to rotate in place. Used for orientation purposes. When used on multiple objects, their current places in relation to each other will be preserved.
CTRL + mouse movement Pressing CRTL while moving the mouse around will cause the selected object to move in two dimensions.
CTRL + LMB + mouse movement Pressing CRTL + LMB while moving the mouse around will cause the selected object to move in the third dimension.

